As if smoking with a bong wasn’t already great, imagine smoking out of your own homemade bong.
Have you forgotten your bong at a friend’s house? Maybe you never actually bought one, or perhaps you’re just feeling a little crafty. Whatever the case, don’t worry, we’ll help you build your own homemade bong, it’s an experience every true stoner should have at least once in their life, at least the water bottle bong.
Understanding the Basics: Parts of a Bong
In this article, you’ll find different options for making your own homemade bong, from the simplest to true art pieces. But let’s cover the basics first, starting with the parts of a bong:
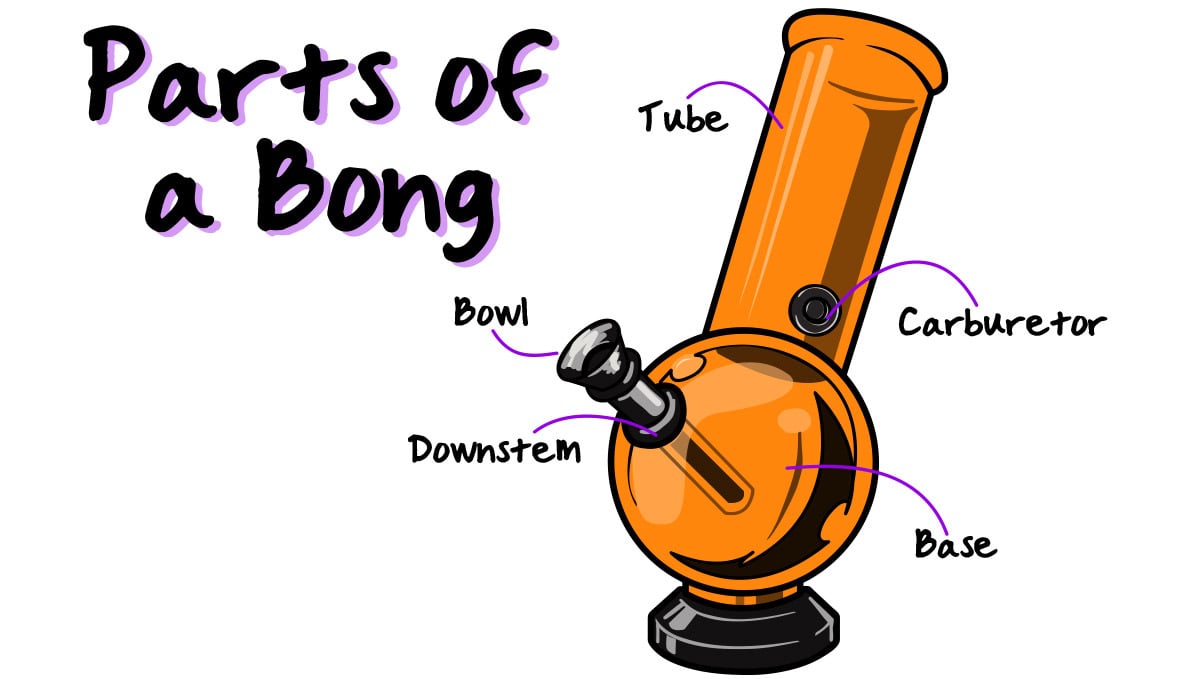
- Tube: it’s usually the neck of the bong in which the smoke rises all the way into your lungs and then wonderland.
- Base: the base is base-ically where the water goes.
- Carb or Carburetor: it’s the small hole on the side or back of the bong which helps you control the airflow with your index finger.
- Bowl: the bowl is the place where you pack your weed.
- Downstem: the downstem is the thinner pipe that’s connected to the bowl, allowing the smoke to travel down to the base into the water and up through the tube.
The Bottle Bong
The water bottle bong is a pretty simple homemade bong, and it’s good for recycling too. To make it you’ll just need to take any type of plastic bottle and a few more things, don’t worry if you don’t have the bottle’s cap because you won’t use it anyway. Keep in mind that the larger the bottle, the bigger the bong hits.
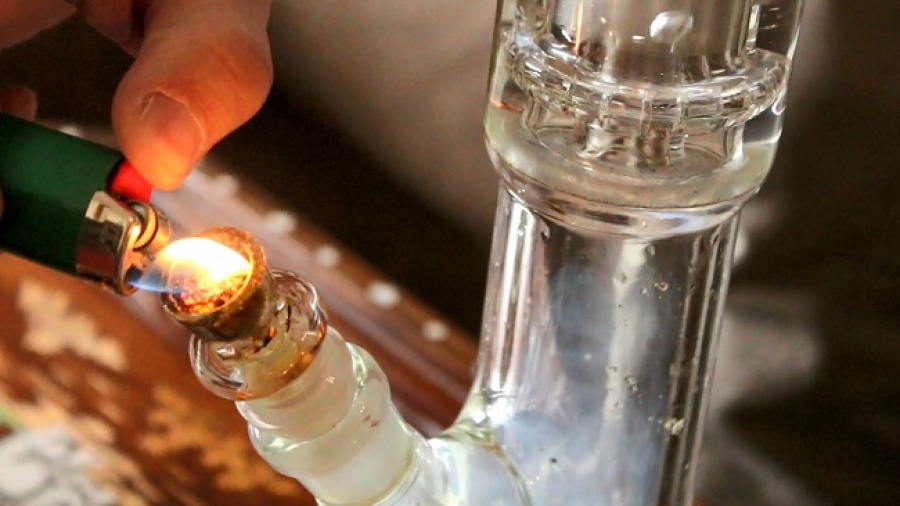
Take your chosen plastic bottle and fill up ¼ of it with water. Now, with a pair of scissors or any sharp object like a pen or screwdriver, poke a small hole just below the neck of the bottle to make the bong’s carb.
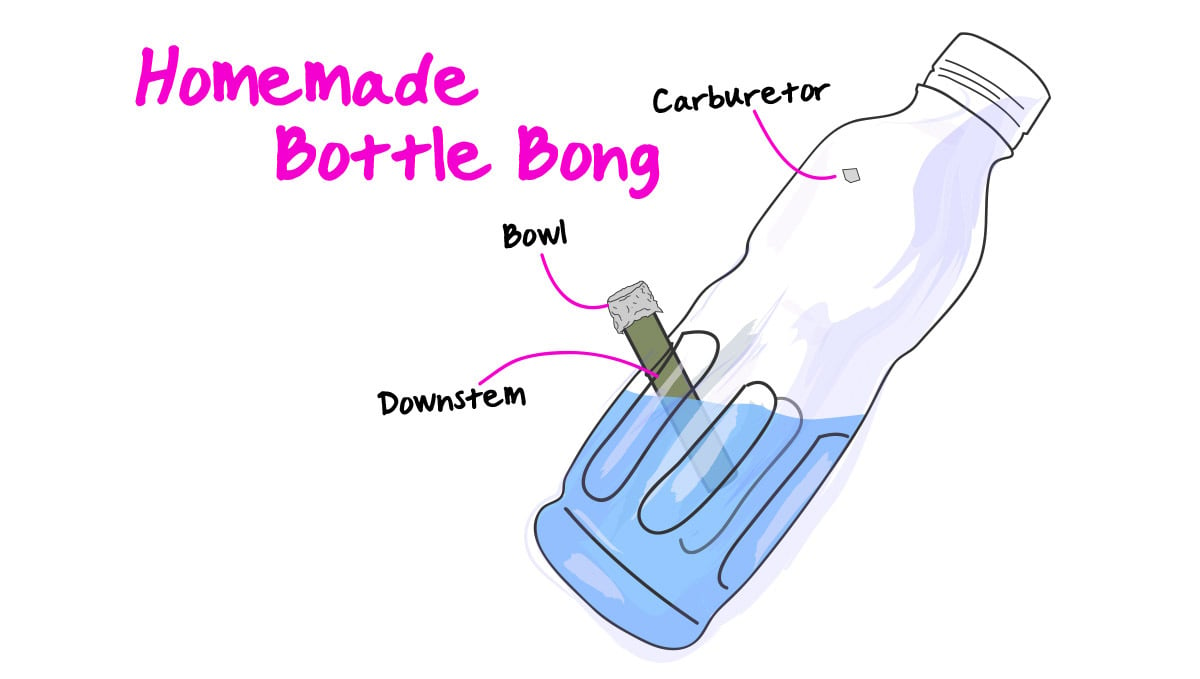
Then, add a second hole slightly above the waterline of your plastic bottle bong. This is where the downstem will be placed. Make sure the hole isn’t too big that the stem is dancing or even falling inside.
Building the downstem and bowl
You’ll need a tube-like object, like an old marker or a pen, and some aluminum foil. The wider the marker’s diameter, the more space you’ll have for placing your buds on the bowl.
First, get rid of the marker/pen’s inner parts, keeping just the hollow tube. Taking the aluminum foil, cover one of the edges, and press softly in the center to create a bowl-like shape. It’s important that the foil doesn’t break because we don’t want the plastic below getting burned while smoking given it’s highly toxic.
All you’ll need before you can light up your new homemade water bottle bong is to bring the pieces together. Take your downstem and stick the open edge into the bottle through the lower hole you’ve previously made, angling it down into the water. Now pack your bowl and fire it up!
Homemade Bongs & Hand Pipes You Can Make With Household Items
Desperate times call for desperate measures. If you do not have a piece to smoke out of you will have to make due with what you have around you.
Making your own smoking device can be a fun and creative way to enjoy your herb smoking experience.
When it comes to making smoking devices from scratch, the two main types of items to make them out of are:
- Food
- Common Household Items
Both can be equally enjoyable and easy to make if done right.
With these household items, you can make some surprisingly cheap and high-quality bongs, bowls, and other smoking devices.
Let’s dive into our step by step guide to making your very own herb smoking devices from home!
How to Make an Apple Bowl
I’d be lying if I told you that I didn’t almost fall in love with the first Stoner chick I saw make a bowl out of an apple in about 3 minutes back in my party days. I figured it would be cool to learn how to make one, and give me a reason to talk to here/smoke with her.
Step 1:
Find a ripe apple and stab a pencil size object through the top down to the middle but not all the way through. This hole is for the bowl pack.
Step 2:
Take that same pencil and poke a hole in the side of the apple that is perpendicular to the first hole you made. Do not poke this hole all the way through the apple either. These two hole should meet in the middle of the apple. This hole will act as the mouthpiece.
Step 3:
Blow through the holes to make sure they are intertwining as well as to clear any excess apple bits clogging the path up.
Step 4:
Make a third hole in another side of the apple that connects to both pathways. This hole will act like a rush to make sure it’s in a good spot that your finger can reach while you hit it.
Step 5:
Shave off the edge of the top hole to make it bowl-shaped and place your flower in the carved out area.
Step 6:
Light the herb and enjoy the fruity taste in every hit!
This is the easiest way to create a do it yourself smoking device. It can also be done with other fruits and vegetables that are sturdy like POTatoes, cucumbers, and even pomegranates.
How to Make a Starburst Hand Pipe
Okay, so this is going to be messy and sticky. Honestly, whoever came up with this was already extremely stoned, or just down on their luck. Either way, you should be prepared for an absolute mess while making this homemade hand pipe. However, it is worth it when you hit something that tastes like a fruit salad.
Step 1:
Take a pack of Starburst and unwrap each individual starburst.
Step 2:
Stack all the Starburst together in the packet besides two.
Step 3:
Stab a skewer through the connected Starburst in order to keep them together. This also creates an air pathway. Stab it all the way through to the other side to create a rush hole at the end.
Step 4:
Stack the two leftover Starburst on top of the lined up Starburst. These will act as your bowl pack.
Step 5:
Poke a hole from the top two Starburst down to the hole originally made from the skewer.
Step 6:
Shape the bowl so it can hold the amount of herb you want to use in the top two Starburst.
Step 7:
Light it up!
The Starburst can also be mashed together and shaped as if it were clay. If you are having a tough time creating this form of the Starburst pipe than soften up the Starburst by heating them up in the microwave for a few seconds and shape them into a regular bowl.
This may be a bit messy and sticky, but in the end, it is a pretty creative and cool way to smoke.
How to Make a Pumpkin Bong
The size and shape differences make each one completely unique, and you get the opportunity to make a bowl pack in them that is relative to their size for being able to include friends in your smoking experience, or packing extra amounts of herbs into your homemade bowl.
The pumpkin bong is the biggest household smoking item on the list.
Step 1:
Find a pumpkin and hollow it out. It does not need to be cleared out as it does for pumpkin carving but you should remove the skin from the walls where the mouthpiece and bowl will go.
Step 2:
Cut a small hole on one side of the pumpkin so a metal nut can be attached and used as the bowl piece. You can also simply carve out a bowl similar to the apple bowl if you do not have a metal nut.
Step 3:
Take a straw or another circular sturdy material and stab in into the pumpkin the side opposite of the bowl piece. This is your mouthpiece. Sockets also work great, as long as they have a wide enough top part to fill with herbs and a skinny enough bottom that will act as a screen so too much herb does not fall through while smoking.
Step 4:
Make a rush hole if needed.
Step 5:
Add water if you prefer. We recommend trying it without water first.
Step 6:
Light it up and enjoy a different kind of pumpkin spice!
Keep in mind that plastic can be very toxic when heated. There’s a Canadian scientific article that shows a homemade plastic device that apparently caused lung hemorrhage and death. I made a little wooden pipe some years ago that worked well enough. It basically just drilled a large bowl hole in one end of narrow rectangular section of natural wood, then drilled into the base of the bowl at a 90 degree angle from the far side (the stem). You can narrow the stem by whittling it, and round the bowl end with a file or sandpaper. Took maybe thirty minutes to make and cost nothing.
I made a little wooden pipe some years ago that worked well enough. It basically just drilled a large bowl hole in one end of narrow rectangular section of natural wood, then drilled into the base of the bowl at a 90 degree angle from the far side (the stem). You can narrow the stem by whittling it, and round the bowl end with a file or sandpaper. Took maybe thirty minutes to make and cost nothing. Hope it helps.
I used clay to fashion a nice little pipe. Then I baked it in my oven for about 4 hrs. It dried really hard so it works well. The only draw back is that dried clay (as compared to ceramics) is very fragile and easy to break if you drop it. I would need a real potters kiln to make it truely ceramic glass. But dried clay is actually the traditional method of making smoking pipes.