Despite the legendary stories surrounding weed use in the 1960s and 1970s, today’s marijuana strains are significantly stronger. Even as late as 1995, the average THC level of samples seized by the DEA was just 4%. By 2014, that number had risen to 12%. Today, it is normal to find a strain with a THC content of 25% or more. Also, it’s believed that the THC to CBD ratio has changed from around 14:1 in 1995 to 80:1 in 2014.
In other words, people from past generations had to come up with some creative ways to get stoned. This search led to some pretty cool innovations, such as the iconic ‘gravity bong.’ It is quick, cheap, and easy to make. Better yet, it gets you very high, very fast — as I can personally attest!
What Is a Gravity Bong?
Experienced users know how to make a gravity bong with a socket from a wrench set. It involves screwing a hole in a bottle lid and attaching the tool to it. Alternatively, find a tool that offers a good fit on a bottle’s mouth.
Make sure the socket is large enough for weed to fit inside. When you do it right, you should get extremely high and conserve cannabis in the bargain. In case you were wondering, here is how to do it.
- Pick a suitable socket. The best sizes range from 12mm to 15mm in diameter.
- Test the fit by placing the socket in the mouth of the bottle.
- Wrap duct tape around the sides of the socket to create a tight seal.
- Place fitted metal gauze into the socket to create a ‘bowl’ for your herb.
- Cut a hole in the bottom of the bottle. Make sure the hole isn’t too large. Otherwise, the water will flow out too quickly.
- Place the bottle in a larger container, which you then fill with water.
- Load the socket and place in the mouth of bottle. Get ready to enjoy it!
In this guide, we are going to show you how to make two other types of gravity bongs.
Gravity Bong – Ultimate Guide
The homemade gravity bong was the secret weapon of many users in the days before marijuana became super strong. It is a method of consuming weed that involves the use of one or two plastic bottles. You use them to funnel the smoke through water before inhaling it. All you have to do is to submerge a small container with a bowl of cannabis on top in a larger plastic bottle or bucket filled with water.
You can purchase a glass gravity bong or a vortex gravity bong if you have the cash to spare. These expensive versions work much better than the plastic version. Even so, you could save yourself money by learning how to make a gravity bong. We show you how to do it below!
GRAVITY BONG TYPES
Making gravity bongs is extremely rewarding, and a good way of keeping your smoke cool and fresh as it enters your lungs. You likely have everything you need right at home to construct one, which takes roughly 3–5 minutes. They can be made in two different styles, either a bucket bong or a waterfall bong (aka a reverse bucket bong).
HOW BUCKET BONGS WORK
Gravity doesn’t play much of a role in the function of bucket bongs, despite the name. They usually involve the bottom half of a 2-litre soda bottle and the top half of a smaller plastic bottle. Really any size will do the trick, so long as you have accurate proportions, where the bottom is larger than the top.
The bigger bottle is filled with water and the smaller one is, well, empty—actually it is just a tubing with a big hole at the bottom and a small one on top. The process of using it is based on the creation of a vacuum. When the top bottle is hoisted out of the bucket of water—as long as the top orifice is (partially) blocked— the flame of your lighter and smoke of your weed are literally sucked into the bottle as you pull it up. High enough to fill it with smoke, but not high enough to pull it out of the water (doing so deserves a slap in the face!). Clearing a bucket bong is way easier than your standard water pipe bong. The reason being, the pressure created when lowering the upper bottle back into the water forces all of the smoke out of the smoke-filled bottle and into your lungs as quickly as possible. Here’s how to make one.
HOW TO MAKE A BUCKET BONG

WHAT YOU WILL NEED
- Box cutter or scissors
- Two different-sized plastic bottles
- Aluminium foil

INSTRUCTIONS
STEP 1
If your makeshift gravity bong has a bucket style, the bottom of the smaller bottle needs to be cut off. The larger this top chamber is, the more smoke it can hold.
STEP 2
Cut the larger bottle in a way, so that all you’re left with is a plastic “bucket”. Now, fill this bucket with water so that the smaller bottle will be mostly submerged, but not to the point that the water level in the small bottle reaches over the last say 4cm.
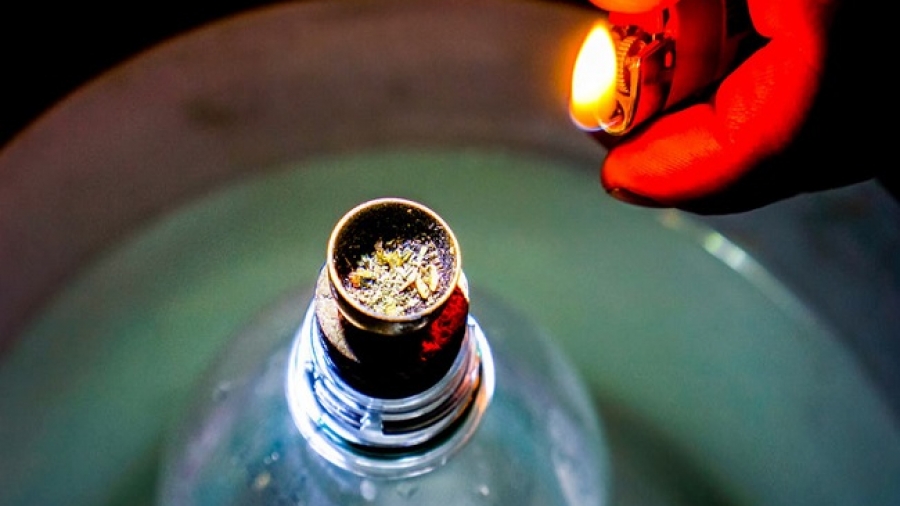
STEP 3
Next, take some aluminium foil and form it to a small bowl. The problem here is, that the burning weed has to be ABOVE the plastic—serious, you don’t want to enhale any degassings of it! You may have to try twice or thrice, but trust us, the effort is well invested. Poke around three or four small holes in the bottom of your foil bowl (without ripping it) to allow for sufficient airflow. Trim off any excess foil if necessary. Remember: In order to take that toke you will have to remove the bowl later on, so make it seal off as good as possible but also easy to remove.
STEP 4
This step requires some care and caution. Submerge the smaller water bottle in the larger bucket bottle, leaving the topmost region of the smaller bottle safely above water.
STEP 5
Load your bowl with your desired amount of cannabis and secure it on the upper orifice of the small bottle.
STEP 6
Now it’s time to light the cannabis. While holding a flame to your cannabis, slowly pull the small bottle upwards and watch it fill with smoke. Once the bottle is filled to maximum capacity, very carefully remove your bowl, and put your mouth securely over the opening. Slowly push the smaller bottle back into the water. As the water floods back into the bottle, the smoke will be pushed deep into your lungs.
And there you have it!
Just forget foil, in Delaware we use sockets from socket wrenches to contain the weed then cut the bottle cap with an X mark big enough to snugly fit the socket holding the weed. Holds the weed safe.