What is a cannabis “clone?” What are the advantages of taking marijuana clones? Well, first of all, cloning is one of the easiest and fastest ways for cannabis growers to make many new (and basically free) weed plants at once!
What Supplies Do I Need for Cloning?
Cloning cannabis is the process of making a smaller copy of a specific cannabis plant. Basically, a clone is a little piece of plant that has been cut off (a “cutting”) from a parent plant and then given the opportunity to make roots of its own.
Cannabis clones are cuttings from a marijuana plant – these cuttings make roots of their own and grow into an identical plant as the “mother!”
Each cannabis clone has the same genes and is a genetic copy of its parent. That means if the parent of the clone is a female, you are guaranteed that all the clones taken from that cannabis plant will be female, too. Why do cannabis growers care about plant gender?
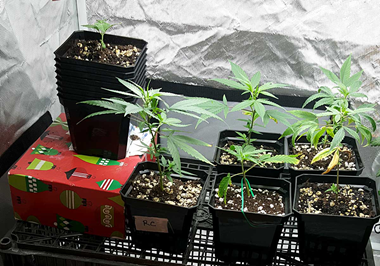
This weed clone was rooted inside a starting cube known as a “Rapid Rooters”
Cloning cannabis lets you make dozens of (practically free) identical cannabis plants quickly! Save your favorite plants to grow again!
Growers can take many clones of a single marijuana plant, and this is an easy way to get many plants that will grow the same way as the mother plant and produce buds with similar characteristics.
Ready? Let’s get started!
PREPARATION
There’s more to preparation than just clearing a space in your home or apartment to set up a grow room or grow tent. Much more.
From figuring out what kind of grow lights you’re going to use to finding the right plant for your setup, prepping each grow is vital to your garden’s success.
Throughout this Preparation section, we’ll show you what you need to figure out what sort of plants you’d like to grow, where to grow them, and what you need to do to prep your garden to start growing.
Choosing Your Plant
Choosing the plant you want to grow is the first thing you should think of before starting. As you’ve heard- and will probably hear a lot in this guide- all plants are different and will require different growing environments.
For example, ornamental flowers like roses need slightly higher temperatures than fruiting plants like orange trees do. They also require different humidity levels to survive, so keep in mind that different types of plants will require their own growing environments, nutrition, and training methods to give you the yield you’re after.
That’s why we suggest doing research on the exact plant you’re interested in and choosing the one that’ll be best for you and your growing conditions.
Not sure what to look for? No problem. Here are some key aspects you should think of when looking for the best strain for your grow:
Long day plant vs Short day plants- Short day plants (SDP’s) require a good amount of darkness and short periods of light. Long day plants (LDP’s) want long periods of light and short periods of darkness. This is important to understand because each plant type needs their own specific feeding, lighting, and environmental requirements and they usually don’t mix well with one another (we’ll get in to that subject in a bit).
Flowering times- This one is vital. Nearly all plants eventually flower, but what that means and when it happens tells you a lot about your plants.
Ornamental flowers have a limited time their pedals will stay at their most colorful before they die off.
The pedals on a fruiting plant’s flowers will eventually shrivel and die as fruit swells. This flowering period lets you know your fruit will start to take shape.
In the case of lettuce, by the time it bears flowers it won’t be of much use to you. When vegetables flower the parts of the plant we use- like the stalks, roots, and leaves- it’s usually a sign that the rest of the plant might not be as useful as hoped.
No matter what plant you’re growing, it’s important to understand how long it will take to flower, whether or not you want it to flower, and in the case of fruiting plants, how long from the time a flowering it will be until fruit appears. This will have an impact on how much light and energy you use, as well as the amount of nutrition and the types of nutrition you give your plants.
Choosing genetics isn’t only about the species of plant you get. It also involves what state you receive those genetics in, and there are two main ways to start plant life: seeds and clones.
Seeds- When you start your garden the old fashion seed-in-the-ground way, you open up your future grow to a lot of benefits:
Seeds are perfect for first time growers- We feel it brings your closer to your plants and makes you a better grower once you know how it’s done naturally.
Seeds are the source of all genetics- Whether you want to create your own strain or you want to hone in on the traits of a particular strain, you’ll need to breed your plants. While seeds aren’t 100% necessary to start growing, they are vital in breeding and enhancing strains.
Your medium will determine how many nutrients you use, what type of nutrients you’ll use, how you feed your plants, and how challenging correcting issues will be.
There are three popular grow mediums to choose from with their own advantages and disadvantages, so be sure you make the right decision before growing those plants:
Soil is the perfect all-purpose medium. Most soil doesn’t need much supplemental nutrition because it’s already loaded with nutrients. Heck, if you mix up your own super soil you can even eliminate around 90% of supplemental nutrition and just use water for the majority of a plant’s life.
Pro’s
Great for beginners, lots of buffer room in terms of feedings and readings.
Retains nutrients the best of all mediums (Needs little nutrients when you start, and all you do is add a little when your plants need them).
Recommended Skill Level: Novice, Advanced, Professional.
Con’s
Plants generally take longer to grow in soil.
Nutrient issues may not show up right away, and when they do it can be difficult to quickly fix (plants can get so sick in soil they’re beyond repair).
Unlike hydro where roots will hang down in bucket, soil roots go all over the place and if you don’t have enough room for those roots you’ll get root bound plants, and those are never good.
Hydroponics is an all-water soil-less way of growing medium. It’s a lot less messy than dirt, and if you run in to nutrient problems they’re much easier and faster to fix than soil problems. Hydroponic grown plants even take less time than soil plants to harvest.
Pro’s
Nutrients are absorbed much faster than in soil.
Hydro is usually faster growing than soil or coco.
Recommended Skill Level: Advanced, Professional.
Con’s
There’s no buffer when growing with hydro like there is with soil- one wrong step and your plants are going to feel it.
Nutrient issues may be easier to fix than in soil, but you’re likely to get more nutrient spikes with hydro than in soil.
Because of moisture collection at the root level, basins and water sources need to be constantly checked and cleaned to prevent mold, fungus, and root rot.
Coco is the perfect middle ground between hydroponic and soil mediums. Though there’s no nutritional value to coco like with soil the nutrition it receives tends to be held in longer than hydroponic applications. That means you won’t have to run such a heavy flow of water like you would in hydro, yet you can assure your plants are getting nutrition from the very beginning instead of trusting soil has enough to carry you through to flowering
Pro’s
Retains nutrients much better than hydro but doesn’t hold on to them too long like soil can.
These generally take a little longer than hydro to grow, but tend to grow a little faster than soil.
Recommended Skill Level: Advanced, Professional.
Con’s
Nutrient issues can be tricky to resolve due to the semi-retainable medium.
Not a ton of buffer when working with coco.
If you don’t break down or mix coco properly you can spike the pH levels of your plants and harm them.
Choosing the Right Grow Light
We’re almost done with the vitals of what you need to get started! Take a breath, we’re almost ready to start growing.
After this step, all you have to do is grab some tools, nutrients, fill those buckets, and get going. But before we get to the easy stuff we have to figure out one last thing: what sort of light you’re going to use to grow your plants.
Your light’s one of the last things that are going to determine how much you’ll be able to yield, how challenging it will be, and how much energy you’re going to consume growing your plants.
As with most things in the grow room, all types of light you can use have their pro’s and con’s in the garden. Some add tons of heat to your grow, others don’t give you enough power, and some even have too much power without adding a degree of temperature to your grow room’s environment. Be sure to look at the benefits and challenges with each light before growing your plants under them:
High Intensity Discharge (HID) Grow Lights: HPS (High Pressure Sodium), Metal Halide (MH), Double Ended (DE) HPS/MH, Ceramic Metal Halide (CMH) Grow Lights
HID’s offer the closest light to the spectrum of the sun (HPS and MH bulbs).
These give you the intense light necessary to grow big, healthy plants with huge yields from start to finish (especially when trained properly).
Wide range of reflectors and wattages to suit any grower’s needs, so there’s bound to be an HID for any application you need.
Manufacturers like Yield Lab Grow Lights can grow anything under the sun: flowers, fruit, veggies, herbs, spices- anything.
Wattage Recommendations:
Standard grow lights (regular HPS/MH) are your run-of-the-mill lights.
400w Grow Lights offer good coverage for 1-3 plants in a 2x4ft or 3x3ft area.
600w Grow Lights are strong enough for 3-4 plants in a 4x4ft or 5x5ft area.
1000w Grow Lights are the strongest of all standard grow lights and can grow around 5-6 plants in a 6x6ft area.
Double ended grow lights are much more intense than standard single ended bulbs because of the dual base connections they offer, firing from two connections instead of a single connection at the base of the bulb.
600w’s are intense versions of their standard counter parts and can cover a 4x4ft or 5x5ft area with ease.
1000w’s are probably some of the strongest lights on the market, and can cover 6x6ft and 8x4ft growing spaces easily.
CMH Grow Lights give you an even spectrum of light without too much blue or red spectrum. These lights have a ceramic base that will outperform single and DE lights of similar wattages because of their ability to fire at high wattages.
315w’s are strong enough to cover a 2x4ft or 3x3ft growing space without pulling all of the energy a 400w light would.
630w’s will be able to cover a 5.5×5.5ft area with light easily without using the energy a 1000w light would.
Start by using 1-2 gallon pots (too big of pots and you can overwater your plants).
Fill the pot about an inch below the tip and tap the medium to let it settle down a little more. This is to take out air pockets in your medium and essentially creates a “fill line” you don’t want to go over when watering.
Once the medium is ready, dig a hole in it the size of your starter cell, rockwool cube, or the smaller pot you need to transplant.
Plant your young plant in the medium, then cover its cell completely with soil/coco.
Note: if you’re using rockwool, cover the cube and expose only the top of the cube.
Water the medium and get your plants under lights.
Note: Soil has the tendency to take in water and leave rockwool cubes to dry. We recommend checking both your medium and your rockwool cube to make sure they’re both saturated as needed.
A note on using little to no supplemental nutrients in soil grown plants- It’s been mentioned before, but it bares repeating now more than ever: if you’re using nutrient-rich soil you do not need to add more nutrients in to your feeding schedule just yet because everything your plant needs to veg is all there- and then some.
VEG: WEEK 1 (DAY 1-7)
Week 1 of VeggingWeek 1 is a little different than the other weeks because depending if you’re starting from seedlings or clones will determine which nutrient mix you follow.
Soil
You’ll most likely water twice this week. Your first watering will be with your nutrient mix and your second watering will just be plain RO water at 6.8pH. With soil always feed every other watering.
Hydro
Watch your pH levels during your first week. They will begin to fluctuate acidity overtime. Since your plants are still young, the change won’t be drastic, but build the habit of measuring your pH every other day to maintain consistency.
Also, check your PPM levels. Maintain PPM between 200-250 for seedlings and 550-700 for early growth/clones for your first week.
Throughout the week, test the pH every day and top it off with fresh water (ideally with 0 ppm). Adjust your pH every other day to maintain levels.
Recommended Lighting Height: Your lights should be no more than 24 inches above the tallest plant and not any closer than 18 inches.
Awesome article. 1 question. I am about to grow my first plant. Or few plants is it hard and how much water do I want to give it. I can’t find anything on that. Thanks in advance.