The common nickname for cannabis—“weed” —comes from its ability to grow almost anywhere, under varying conditions and different climates. “Hydroponic cannabis” simply refers to plants grown using a nutrient-water solution and an inert growing medium rather than nutrient-rich soil. This method could be something as basic as hand-watering pots of inert medium with a nutrient solution. As discussed in the first part of this series, sophisticated systems with multiple pumps, timers, and reservoirs can take some of the daily labor out of growing, but they require more maintenance and setup time as well as a greater initial investment.
What Is Hydroponic Cannabis?
Cannabis growers have been using different hydroponic methods for many years as a way to maximize yields and speed up growth, the two main advantages of soilless growing. Working with soils indoors can be inefficient and difficult for a number of reasons:
- You may not be able to recycle soil
- Susceptibility to pest problems
- Difficult to determine proper amount of nutrients
- Need to carefully monitor soil pH
- Soil quality significantly influences the final product
With some hydroponic methods, you get to use small amounts of grow media that can often be reused while also precisely controlling what nutrients the plants are receiving and pH levels. With such levels of control, growers find that their buds are bigger, healthier and more potent.
Whether you have grown cannabis before or have no experience growing cannabis whatsoever, hydroponics can be a great way to produce cannabis in any size space. At first it can be confusing and slightly overwhelming, but by learning the basics you will come to understand it’s not as difficult as you imagined.
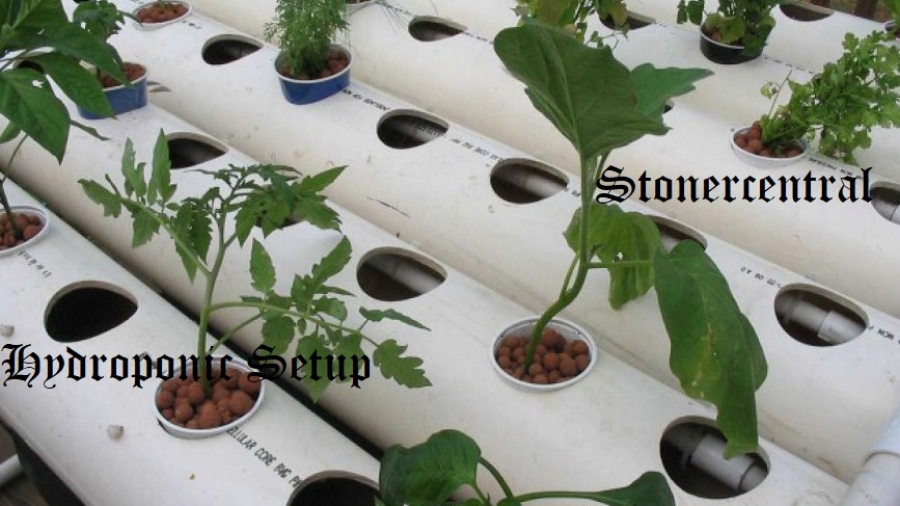
Set Up Your Hydroponic Cannabis Growing System
And while there are several types of hydroponic setups that don’t use any type of growing medium at all, many of them still use some sort of substrate to support root growth.
Various materials all provide slightly different benefits and drawbacks, so some thought should be put into choosing the right medium for your cannabis plants. In this article, we are going to be utilizing the drip line hydroponics technique.
While this system is built from the ground up, it should be noted that there are plenty of plug and play systems available for those looking for something that is easy to set up. Plug and play systems come with everything you need in a streamlined package to allow growers to get started on the right foot.
First we will start with the supplies needed. Keep in mind this is just an example, and depending on your space and desired results, many things can be tweaked in a hydroponic system to make it most beneficial to you. This list specifically outlines equipment needed to install your hydroponic system and does not include lights, fans, filters, and other basic needs for any grow room.
Hydroponic Cannabis Supplies:
- 3 or 5 gallon bucket (one for each plant)
- Grow table
- Clay pellets (enough to fill each bucket)
- Rockwool cubes (one 1.5-inch starter plug per plant)
- Reservoir tank (depending on the size of garden)
- Water pump (the bigger the better)
- Air pump
- Air stone
- Plastic tubing
- Drip line
- Drip line emitters (one or two per plant)
Once you have gathered your materials you can begin to construct your hydroponic setup.
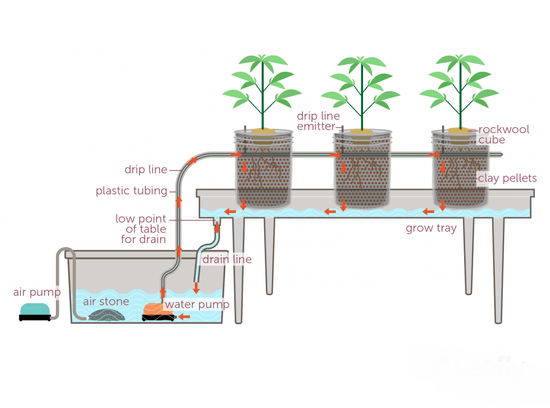
- First, set up your reservoir. Your reservoir is where your nutrient solution is held. A reservoir can come in all shapes and sizes depending on your grow space and size, and it holds the water pump and the air stone. It will have a line in from the air pump to the air stone and a drainage line in from the grow table. The reservoir will have a line out from the water pump to the drip line and the power cord for the water pump.
- Next you will create your grow table. The purpose of the table is to contain and return the excess water from the plants to the reservoir. To do this successfully, the table needs to have a low point where all the excess water will travel to. This low point is where you install the drain that will take the water back to the reservoir via plastic tubing.
- You can then add your 5 gallon buckets filled with clay pellets on the table. Before using clay pellets, you should soak the pellets overnight to allow them to become fully saturated with water for your plants to drink. Also, the buckets need to have holes drilled in the bottom to allow them to drain excess water onto the grow table. It is important that the holes are about half the diameter of the clay pellets to prevent the pellets from passing through or clogging the holes.
- Take the plastic tubing coming off of the water pump and run the line to the grow table. From here you can use drip line equipment to puncture holes in the plastic tubing and extend drip line to each bucket. Finally, attach drip line emitters to the end of the drip lines.
- From here you can run your system without plants to see if everything is functioning properly. The system should not have standing water anywhere. The air pump should always be running to keep the water in the reservoir oxygenated and moving, while the 5 gallon buckets and grow table drains any excess water back into the reservoir.
- At this point you are setup and ready to create your nutrient water solution in your reservoir. Below we will introduce information about nutrients and how to use them to grow your cannabis plants.
- Once your solution is ready, can introduce your plants. Take the starts or clones that have begun growing in rockwool and place them into the clay pellets. Insert the drip line so that moisture is reaching the rockwool and roots of your starts.
A benefit this setup offers is that it can easily be expanded as you want to grow more plants as long as your reservoir has enough capacity to provide all the plants with enough water. To expand a drip line setup, all you need to do is add additional lines to the new pots.
Nutrients for Hydroponic Cannabis

When growing hydroponically, you are responsible for providing all of the nutrients necessary for plants to survive. Nitrogen (N), Phosphorus (P), and Potassium (K) are the three essential nutrients for plant growth known as macronutrients. Additionally, there are secondary and micronutrients that will help the plant develop as well. These include Boron, Calcium, Copper, Iron, Magnesium, Sulfur, and Zinc.
Many companies sell hydroponic nutrient solutions that are specifically designed for certain stages of growth. Nitrogen-rich nutrient solutions will be used in the vegetative stage while phosphorus-rich nutrients become more necessary in the flowering phase.
Nutrients will come either pre-mixed in a solution or in powder form. While powder form might be cheaper and less bulky, it is best to stick with liquid pre-mixed nutrients if you are a small-time grower as they mix with water easily and are more forgiving.
Explore Nutrients for Your Hydroponic Cannabis
When mixing in nutrients, take a few measurements to make sure your solution is safe for the plants. First, make sure you have the right EC (electrical conductivity) reading, and secondly, ensure your pH reading is correct.
The EC reading is how growers can tell how strong their solution is, and how mineral-rich the water is. The more minerals, the higher the EC rating will be. Generally speaking, a reading between 0.8 to 2.0 is appropriate for growing cannabis. When a plant is young, it will need a lower amount of nutrients as opposed to when it is flowering and growing quite big.
Another common measurement used is ppm (parts per million) which is another way of looking at how nutrient-dense your solution is. There are two different scales for ppm used in the cannabis industry: the 500 and the 700 scale. The most efficient way to determine ppm is to take an EC reading, multiply it by either 500 or 700 depending on the scale you are using. An EC reading of 2.0 would equal either 1,000 ppm (500 scale) or 1,400 ppm (700 scale). Many readers used to measure EC or ppm will do this conversion for you.
The lower the ppm, the less nutrient-dense a solution is. As a general rule, aim for the following densities based on your plant’s age:
- Seedlings/early sprouts – 100 to 250 ppm
- Early vegetative stage – 300 to 400 ppm
- Full vegetative stage – 450 to 700 ppm
- Early blooming stage – 750 to 950 ppm
- Full mature bloom/ripening stage – 1,000 to 1,600 ppm
Note what scale the nutrients you are using are based upon before making any nutrient solutions.
Next, you’ll need to balance the pH level. Between 5.5 and 6 is ideal for cannabis to absorb the nutrients. If levels are off significantly, the plants will fail to uptake the nutrients and will suffer deficiencies.
You should continue to monitor your solution by taking readings two times a day to make sure everything is at the correct levels. Regardless, it is good practice to switch out your solutions every week or two to keep the solution as optimal as possible.
Honestly, had no idea what I was doing in hydroponics until this article. After this grow doing a complete overhaul and changing to buckets. Nice simple and clean cut info no dancing around subjects. Thanks for sharing this info!