Cannabis is a medicine, a hobby, a culture, a way to kick back with friends, and a great ice-breaker. But as anybody who has ever grown their own successful marijuana harvest can tell you — there’s nothing like growing your own cannabis to make you truly appreciate the plant.
First off, growing your own cannabis can save you a lot of money, even with a small harvest. After drying and curing you should be able to get an ounce or more out of each plant cycle, and you can easily run a few cycles each year.
One of the things that cannabis growers often struggle with is providing a uniform environment for their plants to grow in. Choosing the area you want to grow in is essential to the success of your grow op. Grow cabinets provide a stable environment for your plants, and come ready to go right out of the box.
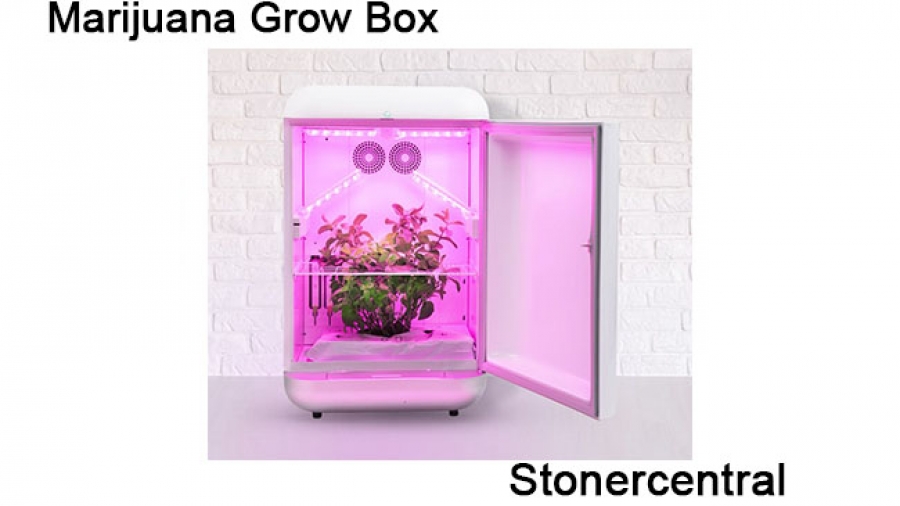
What is a Marijuana Grow Box?
For those of you at home wondering, ‘what in the world is a marijuana grow box and why would I want to make one?’ you’re not alone. Despite being one of the cheapest, easiest, and sneakiest ways of growing weed, grow boxes still aren’t as popular as they should be. But what kind of weed lover wouldn’t want an entirely self-contained cannabis growing chamber? That’s right! A marijuana grow box is essentially a large box with shiny insides, grow lights, and ventilation fans built in.
And it only gets better! Since grow boxes are so small and reflective, you’ll get a lot of bang for your electricity’s buck. Lots of growers even invest in expensive lighting for these boxes since they’re more energy efficient. Pricey lights aren’t necessary but they sure do pay off in the long run. Grow boxes are also incredibly versatile and can be as fancy (or as basic) as you want! From pre-made tents that come with all the swanky attachments to the basic cardboard and foil box with thrift store lights and fans, DIY marijuana grow boxes let you set your own speed. So think about your price range and, if you’re being honest, your DIY capabilities, and get ready to build your own marijuana grow box.
Top 7 Advantages to Using a Grow Cabinet
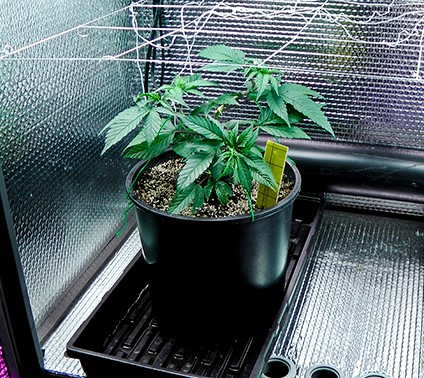
- Complete – Grow Cabinets come complete will fans and filters for ventilation and air quality, grow lights and reflective interiors for superior lighting during all cycles of growth and locking capabilities for added protection (especially helpful to cannabis growers). Most grow boxes also include other components, such as pumps, timers, nutrients, pH adjusters, and grow media.
- Adaptable – Gardeners can adjust the conditions within their grow cabinets, including the lighting, temperature, humidity, ventilation, and watering schedule. These enclosed grow boxes allow the gardener to produce the highest quality indoor crops possible because the grower is in total control of deciding and implementing the best growing environment. Seedlings, clones, and mature plants can be effectively grown inside grow lockers, as well as hydroponic or soil crops (such as cannabis, herbs, vegetables, and more).
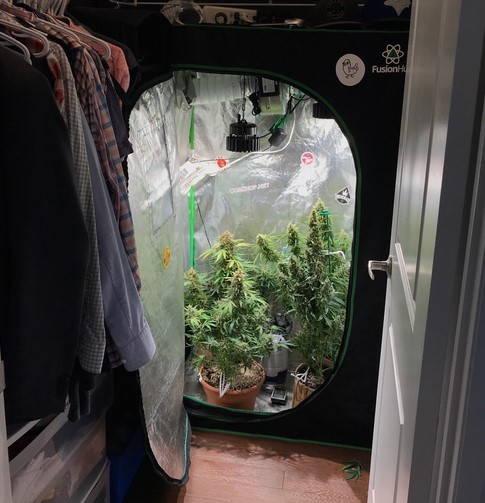
- Compact –While grow tents are often used by marijuana gardeners and other indoor growers to create ideal conditions for plants, these have a bulkier composition and take up more space than their smaller grow cabinet cousins. Most grow cabinets are narrow and stand only a few feet tall, making them incredibly space-saving and adaptable to any indoor setting. Grow cabinets are small enough to be used in an apartment, bedroom, closets, basement, garage, hallway, or elsewhere. Plus, most are lightweight, transportable, and easy to set up.
- Discreet – Another advantage over grow tents – especially for cannabis growers – is the inconspicuous nature of grow cabinets. Their appearance resembles a dorm refrigerator, file cabinet, safe box, or storage locker. Most stealth grow cabinets require a key, padlock, or personalized code to open, providing an added layer of protection. It is no coincidence, then, that marijuana growers feel especially secure growing their weed inside a grow cabinet.
- Odor Control – As you may know, marijuana has a distinctive and pungent odor. Vegetables and herbs – much less so. Therefore, cannabis cultivators will especially appreciate the odor-eliminating features of grow cabinets. Carbon (charcoal) filters are used to thwart the smell of weed so your living space remains odor-free and your marijuana growing remains secretive and nearly undetectable.
- Effective – Providing ideal conditions means that grow cabinets can produce the highest yielding and best quality crops. There is less monitoring and maintenance required because all the components inside a grow box are automated to do the work for you. And indoor gardening means that crops can grow year-round and at an arm’s length away. Grow cabinets also provide protection against bugs and other pests.
- Economical – Don’t be alarmed by some of the high price tags. As we mentioned before, grow cabinets come complete with all the components you need to start growing (including grow lights, filter, fans, pumps, and grow media). Therefore, you don’t need to purchase these items separately. Plus, grow cabinets will provide years of continuous harvests. So an investment in a grow cabinet is a wise and economical investment in the long run.
Tools for your DIY Marijuana Grow Box
Having all of the right tools for making your DIY marijuana grow box is important. While some DIY projects can be done without certain supplies, you’ll find this box hard to finish (at least correctly) if you’re missing anything. And a bad grow box usually translates to a bad weed-growing experience. Lucky for you, these items are generally cheap and can be found either around the house or at a local thrift store! And when in doubt you can always try Home Depot.
Supplies:
- Large cardboard box
- Pencil, pen, or marker
- Measuring tape or ruler
- Aluminum foil
- Reflective duct tape
- Grow lights
- Two small fans
- Surge protector
- Boxcutter
- Growing pots
- Soil
- Weed or weed seeds
How to Make your Marijuana Grow Box?
Now that you have everything you need to make your marijuana grow box it’s time to read the directions and follow them closely. Remember, you can always use more expensive or more advanced tools and techniques when assembling your DIY marijuana grow box. This guide’s aim is to make grow boxes accessible to anyone. If you want to use an armoire instead of a cardboard box, then that’s your prerogative! This can be a fire hazard though, so make your box with care and safety in mind.
Also, make sure to lay out your supplies and tools before starting on the project – you’ll want everything close by. Smoking weed while assembling your box is an option but may result in slow progress.
Directions:
- Place the cardboard box on your work surface standing taller than it is wide. The box needs to be big enough (both vertically and horizontally) to fit at least one moderately-sized plant. The bigger the box the bigger the grow.
- Measure and write down the diameter of your fans, then do the same for your outlet plug from the grow lights. You’ll want to be precise here so don’t be afraid to measure everything twice!
- Once you’re sure your measurements are accurate, mark up the cardboard box with your pencil, pen, or marker. The first fan should be approximately three inches from the base of the cardboard box on the side opposite the opening while the second fan should be three inches from the top of the box on either the left or right side. Mark your outlet hole through the top of your box in whichever spot best suits your grow lights.
- After measuring and marking the box, carefully cut out the two fan holes and outlet hole with the boxcutter. Don’t get reckless here – it’s an important step (and boxcutters are sharp)!
- Remove and discard any excess cardboard from the box and test each hole to make sure the fans and outlet fit perfectly. If they do, then great! If not, adjust and re-test until the results are satisfactory.
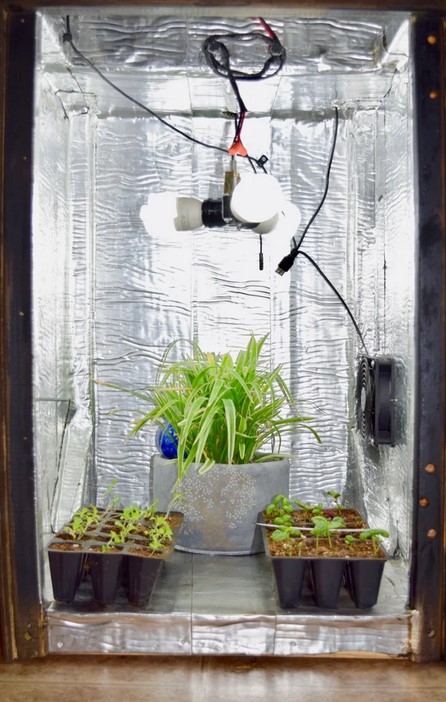
- Now grab your aluminum foil and get ready to roll! You’re going to coat the entire interior of that box in shiny foil – don’t be stingy, you don’t want any cardboard visible. The foil should stay up without adherent, but you can use glue at this stage if you want (to make a mess).
- Carefully make incisions in the foil over your holes and fold the extra foil outwards for more coverage.
- From inside the box, push your outlet through its hole and pull through until your grow lights are comfortably situated in the box. Attach with your reflective duct tape.
- Place the bottom fan in its hole, making sure it is situated to blow air inwards rather than blow it out. The top fan should be situated with the air blowing outward. Attach the fans only when you’re SURE they are situated correctly using as much duct tape as you feel necessary. Remember that airtight is good and more airtight is even better!
- You’re almost done with your DIY marijuana grow box after attaching your lights and fans. Now all you have to do is double check the box to be sure it is aluminum foiled to the max. Anything that can be covered in foil should be covered in foil – your plant will love all that reflected light.
- Test out the door, the fans, and the lights. Use your surge protector to avoid the stress of figuring out how to put three plugs in two outlets.
- Now your DIY marijuana grow box is ready for all of your weed-growing needs! Just turn on the lights and the fans, stick your plant (or plants) inside, and water when necessary. At this point, if you know how to grow weed, then the box will do the rest! Just keep an eye out for fire hazards since losing your box along with the plant inside would really suck.
Good Luck!)
What is a good grow box for an amateur growing in an apartment? Any advice would be appreciated. Thanks.
It really depends on your budget, noise and size constraints. Tell me what space size you have to grow with, and tell me how much weed you wish to produce in say, 6 months. Then tel me your budget.